I haven't decided if I'll actually post one of my pictures of this recipe to this blog....
Let's put it this way - this recipe for "3 minute No-Bake" cookies from QuakerOats.com is GREAT. Easy, tasty, and fast to make. I'll definitely make them again but...
They look like little piles of poo!! Being not baked they even have a little bit of a "poo sheen" to them as I called it last night. They look like that in person, and even worse in a picture. I am all about taste over appearance but this is one of those times where I possibly prefer to keep the appearance safe in my home and not out on the internet. Not even the Quaker Oats website has a picture on it....that probably should have told me something.
Bottom line though, these are very good, and even richer than I thought they'd be and I will make them again despite their unappetizing appearance. I just hope no one looks at my husband funny if they see him take a few out of his lunch bag today!
3 Minute No Bake Cookies
(from QuakerOats.com)
2 cups granulated sugar
8 tablespoons (1 stick) margarine or butter
1/2 cup low-fat milk
1/3 cup baking cocoa
3 cups Quaker® Oats (quick or old fashioned, uncooked)
In large saucepan, combine sugar, margarine, milk and cocoa. Bring to boil over medium heat, stirring frequently. Continue boiling 3 minutes, stirring frequently.
Remove from heat. Stir in oats.* Drop by tablespoonfuls onto waxed paper. Let stand until firm. Store tightly covered.
*If using old fashioned oats, cool mixture in saucepan 5 minutes.
Thursday, August 28, 2008
Cookies that don't look so good...but taste good!
Sunday, August 24, 2008
It's not easy being green
My tomato plants in the garden are producing a decent amount of tomatoes but...
They aren't turning red!! I asked around and a lot of people in this area are experiencing the same problem. I had one big guy that I didn't see right away that had turned red but had unfortunately turned into something inedible and even he wasn't even 100% red yet. So in order to save some of my "crop" (and yes, I use that term loosely) from rotting away, I picked some green tomatoes. Some of them have gone into a paper bag. I will let you know if that trick works....
In the meantime I thought maybe I could make something with a few of the green tomatoes. MyRecipes.com to the rescue again with this yummy recipe for Sweet and Sour Green Tomato Salsa. Another addicting recipe that involves something from the garden!
Sweet and Sour Green Tomato Salsa
(from myrecipes.com)

1 red bell pepper
2 1/2 cups chopped green tomato
1 tablespoon balsamic vinegar
1 teaspoon brown sugar
1/2 teaspoon salt
1/3 cup finely chopped sweet onion
1 garlic clove, minced
Preheat broiler. Cut the bell pepper in half lengthwise, discarding seeds and membranes. Place the pepper halves, skin sides up, on a foil-lined baking sheet; flatten with hand. Broil for 10 minutes or until blackened. Place in a zip-top plastic bag; seal. Let stand 10 minutes. Peel and finely chop. (I omitted this step and used roasted red peppers from a jar, I added what I figured to be a proper amount by eye).
Place the chopped green tomato, vinegar, sugar, and salt in a blender or food processor, and process until smooth.
Place the tomato mixture in a small saucepan; cook over medium-high heat 5 minutes or until liquid almost evaporates. Place in a small bowl; cool to room temperature. Add roasted pepper, onion, and garlic to tomato mixture; toss well.
Feeling crabby
Crabby for crabcakes that is! Last weekend (yes it has taken me a week to get an update up here) I made some lovely crabcakes via this recipe from Cooking Light. My husband and I love crab but rarely have it but the mood struck me and don't you think that Myrecipes.com sent me a crab cake recipe via it's "daily dish" e-mail. Can we say: Perfect?
Of course I de-Cooking Lighted the recipe a little (yeah, I made that term up...I like it) by adding some mayo. I didn't add much but felt I needed a little more of something to hold the patties together a bit better.
The original recipe also called for diced pimentos which I nixed and diced up some roasted red peppers instead - small of course - so my husband would eat them. As I mentioned before, he will eat onions and peppers as long as he can't see them (*Robin rolls her eyes*).
End result? Yummy crabcakes of course which left us feeling anything but crabby! I served them alongside some steamed broccoli and carrots and some couscous tossed in olive oil. This recipe is definitely going in my pile of keepers!
Crab Cakes with Remoulade
(from MyRecipes.com)
Crab cakes:
2 teaspoons olive oil 
1 cup dry breadcrumbs
1/2 cup thinly sliced green onions
1/2 pound lump crabmeat, shell pieces removed
1/4 cup diced roasted red peppers
1 tablespoon Dijon mustard
1 tablespoon mayonnaise
1 tablespoon fresh lemon juice
1/4 teaspoon salt
1 large egg
Rémoulade:
1/3 cup low-fat mayonnaise
2 teaspoons 2% reduced-fat milk
1 teaspoon capers, chopped
1/8 teaspoon ground red pepper
1 small garlic clove, minced
To prepare crab cakes, heat oil in a large nonstick skillet over medium-high heat.
Combine breadcrumbs, onions, crabmeat, and pimiento in a medium bowl. Combine mustard, juice, salt, and egg, stirring with a whisk. Add egg mixture to crab mixture, tossing gently to combine. Divide crab mixture into 4 equal portions, shaping each into a 1-inch-thick patty.
Add crab cakes to skillet; cook 2 minutes. Turn cakes; reduce heat to medium. Cook 3 minutes or until golden brown.
To prepare rémoulade, combine mayonnaise and remaining ingredients, stirring with a whisk. Serve with crab cakes.
Yield
4 servings (serving size: 1 crab cake and 2 tablespoons rémoulade)
Friday, August 22, 2008
Jalapenos from the garden...
So I am growing my first vegetable garden this summer and I've been blessed with a gaggle of jalapenos.
Yeah, I know, a gaggle refers to geese but today I want a gaggle to refer to my jalapenos...and what I say in my blog, goes! What to do with this gaggle, I pondered. I looked around for some good recipes and one stood out among them all - Bacon Wrapped Jalapeno Thingies from none other than The Pioneer Woman Cooks!
First off, how much easier could these get? And anything that involved cream cheese is a winner in my book! I did take a picture of my little guys that I have yet to upload. In the meantime, please enjoy The Pioneer Woman's much better photography. They do these "thingies" much more justice than my picture will. When my next stash of these little guys are ready to pick I will be sure to make some more of these. They are plain old addicting!!! Spicy (too spicy for my husband....but that just means more for ME!), but addicting.
And since they are so simple (p.s. I had to forgo the toothpicks since I couldn't find any in the cabinet and the bacon pretty much stayed put anyway), they make a fabulous appetizer to just have at home one night before dinner (which is what we did) or even to bring to a party. These are an A+ in my book!
Tuesday, August 19, 2008
Recipe Remix Part III
Keep the entries coming for our 3rd installment of Recipe Remix!!! This time we are remixing grilled favorites. We've gotten some fun entries already and look forward to seeing lots more!
Tuesday, August 12, 2008
Crustless Quiche Tarts & Tasty Tools!


5 large eggs
About ¼ cup milk
2 cooked Italian sausages, diced into small pieces
2 tablespoons grated onion

2 medium sized potatoes, peeled, diced into small pieces, boiled and drained
1 Cup(s) shredded Colby jack cheese
1/2 Teaspoon black pepper
1/4 Teaspoon salt
½ teaspoon minced garlic
½ teaspoon Italian seasoning
Cooking Spray
Preheat oven to 350 degrees F. Generously spray mini tart pans with cooking spray
In a medium bowl, beat together eggs, mayonnaise, milk, pepper, salt, garlic, and Italian seasoning until thoroughly blended with whisk. Stir in sausage, cheese, onion, and potatoes. Pour into mini tarts.
Bake for 12 – 18 minutes, or until knife comes out clean.
Makes 6 mini tart sized quiches
Monday, August 11, 2008
Zucchini Bake
Last night we went to my aunt & uncle's house for a little cookout. I had asked my aunt earlier in the week if I could bring anything, she said a side dish she could put in the oven, since the grill would be full would be great. I wanted something "summery" and since on my local nest board we had just been talking about zucchini casseroles I knew immediately that would be perfect. I used a recipe shared by Gina, one of the lovely ladies on the board.
It was so rich, cheesey, and delicious. Anything with breadcrumbs, heavy cream, and that much cheese just has to be good, right? It was a great accompaniment to the steaks, and baked potatoes.
There's no picture, so just use your imagination :-)
Zucchini Bake
2 Tablespoons olive oil
1 1/2 Pounds sliced lengthwise,1/4 inch thick zucchini
1 Dash to taste salt
1 Dash to taste black pepper
1 Cup heavy cream
1 Cup grated mozzarella*
1 Cup grated fontina cheese
1/4 Cup grated Romano cheese
1 Cup plain dried bread crumbs (I used Italian Seasoned)
4 Tablespoon(s) butter
Preheat oven to 375 degrees F.
Coat the bottom of a 9 by 13-inch baking dish with extra-virgin olive oil. Arrange zucchini slices on the bottom of the dish and season with salt and freshly ground black pepper. Evenly pour 1/3 cup of the heavy cream and sprinkle with 1/3 of a cup of mozzarella, 1/3 cup fontina and 2 tablespoons of the Romano. Sprinkle with 1/3 cup of the bread crumbs. Repeat layers, ending with the bread crumbs. Cut the 4 tablespoons of butter into 1/2-inch cubes and sprinkle over the top of the dish. Line a baking sheet with aluminum foil, place the baking dish on top and bake for 40 minutes until bubbling and the top is golden brown.
*For cheeses I actually used a mix of shredded mozarella, parmesan, provolone, romano, and fontia*
Monday, August 4, 2008
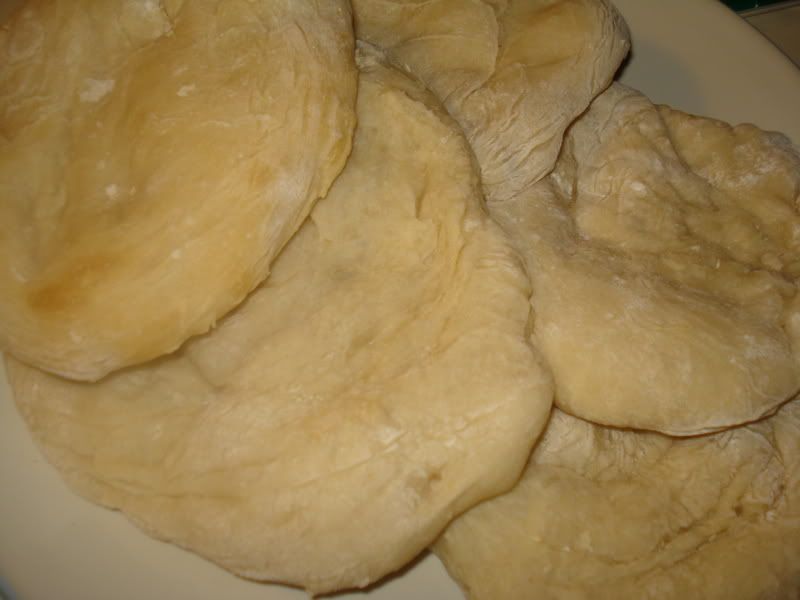
Homemade Pita Bread
I have to say that I find it funny that a few short months ago the thought of making homemade bread scared the heck out of me. It took an afternoon of cooking with Dani to propel me past this unreasonable fear of yeast when her and I made French Bread together. Since then I also tackled TWD's Pecan Honey Sticky Buns.
When I saw Brown Eyed Baker's recipe for Homemade Pita Bread, I was excited to make it...albeit that it took me a few months to actually get around to making it, but I finally did!
While the outcome of my pita bread was not complete perfection, it was far from a failure. I think I made the first mistake when I realized I needed just a take more water for the first step...I think I added a bit too much extra making my dough very sticky. This made is extremely hard to work with for the rest of the process because it just stuck to everything! It made it pretty difficult also to shape them into discs, as you can see they are far from perfect looking.
The rising process, however, seemed to be right on target for me as far as times. I made bigger pitas so I got 6 out of this recipe on purpose since I am using this as sandwich bread. The end result is that they tasted great but with one missing detail - they lacked a pocket! I am not sure if this is due to my water error, not giving the dough enough time to rise, using active dry yeast, or kneading the dough too much or maybe even too little (I used my stand mixer for 10 minutes). It could have happned anywhere in the process. The consistency of the pita bread is spot on to what I'd find at the bakery but just without a pocket. I did make these thick enough though that I can cut a pocket into it. Maybe that was even my problem, perhaps they were too thick!
Anyway, I do plan on making this again and hopefully getting a prettier and more of a pocket-y result! It was still fun to make, they still taste good, and the experience has not deterred me at all from making more breads, in fact it only motivates me more! So overall this was more than a worthwhile experience!
Pita Bread
(from BrownEyed Baker's Blog)
Makes 8 pitas
3 cups flour
1 1/2 teaspoons salt
1 Tablespoon sugar or honey
1 packet yeast [I used active dry yeat]
1 1/4 to 1 1/2 cups water, roughly at room temperature
2 tablespoons olive oil, vegetable oil, butter, or shortening
Mix the yeast in with the flour, salt, and sugar. Add the olive oil and 1 1/4 cup water and stir together with a wooden spoon. All of the ingredients should form a ball. If some of the flour will not stick to the ball, add more water [I had to add a bit more water but probably a little too much so do so with caution!].
Once all of the ingredients form a ball, place the ball on a work surface, such as a cutting board, and knead the dough for approximately 10 minutes. If you are using an electric mixer, mix it at low speed for 10 minutes.
When you are done kneading the dough, place it in a bowl that has been lightly coated with oil. Form a ball out of the dough and place it into the bowl, rolling the ball of dough around in the bowl so that it has a light coat of oil on all sides. Cover the bowl with plastic wrap or a damp kitchen towel and set aside to rise until it has doubled in size, approximately 90 minutes.
When it has doubled in size, punch the dough down to release some of the trapped gases and divide it into 8 pieces (I broke mine into 6 pieces). Roll each piece into a ball, cover the balls with a damp kitchen towel, and let them rest for 20 minutes. This step allows the dough to relax so that it’ll be easier to shape.
While the dough is resting, preheat the oven to 450 degrees. If you have a baking stone, put it in the oven to preheat as well. If you do not have a baking stone, turn a cookie sheet upside down and place it on the middle rack of the oven while you are preheating the oven. This will be the surface on which you bake your pitas.
After the dough has relaxed for 20 minutes, spread a light coating of flour on a work surface and place one of the balls of dough there. Sprinkle a little bit of flour on top of the dough and use a rolling pin or your hands to stretch and flatten the dough. You should be able to roll it out to between 1/8 and 1/4 inch thick - 6 inches in diameter. If the dough does not stretch sufficiently you can cover it with the damp towel and let it rest 5 to 10 minutes before trying again.
Lasagna...Mexican Style
The other night I was searching for something "different" to have for dinner, yet something that was somewhat of a comfort food. I went to one of my many trusty food sites for ideas - FoodNetwork.com. After scrolling through a few options, I got lasagna on the brain, but I was still itching for something different. That's when I stumbled across Rachael Ray's Mexican Lasagna recipe.
I already had some tortillas in the freezer that I could use and ground turkey was on sale (which I used in place of the original recipe calling for ground chicken). As far as other changes I made to this recipe - I used salsa instead of taco sauce, left out the black beans, and red onion and added a few of my own touches (garlic, pepper). Ok, so I made a decent amount of changes, but I generally stuck with the concept of it all, which is one I probably wouldn't have thought of on my own. The result? Not your typical lasagna, but still an oh so comforting meal loaded with some spice and plenty of cheesy goodness! I will be making this again!
Mexican Lasagna
(from FoodNetwork.com)
2 tablespoons extra-virgin olive oil
2 pounds ground turkey
2 tablespoons chili powder
2 teaspoons ground cumin
1 teaspooon minced garlic
1/4 teaspoon black pepper
1 (15-ounce) can black beans, drained (I omitted)
1 cup medium salsa
1 cup frozen corn kernels
Salt
8 (8 inch) flour tortillas
2 1/2 cups shredded Cheddar or shredded pepper jack (I used a combination of both)
Preheat the oven to 425 degrees F.
Preheat a large skillet over medium high heat. Add 2 tablespoons extra-virgin olive oil - twice around the pan. Add turkey and season with chili powder, cumin, pepper, and garlic. Brown the meat, 5 minutes. Add salsa. add corn. Heat the mixture through, 2 to 3 minutes then season with salt, to your taste.
Coat a shallow baking dish (I used an 8x8 dish) generously with cooking spray. Cut the tortillas in half or quarters to make them easy to layer with. Build lasagna in layers of meat, then tortillas, then cheese. Repeat: meat, tortilla, cheese again. Bake lasagna 12 to 15 minutes until cheese is brown and bubbly.

Saturday, August 2, 2008
Don't forget!
Happy August all! Don't forget about our 3rd round of Recipe Remix focused on grilled favorites this time. The deadline for entries is Wednesday September 3rd! Happy Remixing!